Space wolves are always right at home in the snow, but too often I see armies based in solid snow fields so thick, an 800 pound astartes should be sunken to his knees in the drift. I wanted to do something different: a truly wartorn field that, while once a serene field of snow, had been churned and shifted by the tides of battle. The snow has been ground into the dirt, turning it to mud. Constant artillery barrages have long ago reduced any semblance of roads or paths to upheaved chunks of stone. Snow patches remain, the result of a snowstorm unwilling to lift. Snow still drifts down on the warriors from above, clinging to their armor and conveying the temperature of this desolate land they fight over. Here and there, the corpses of the enemy reveal themselves, whether recently killed, or just shifted back to the surface by the latest barrage of artillery shells.
Let's jump into how I did it.
 What you'll need:
1. Woodland Scenics Snow - You can find this most places that sell supplies for HO scale trains.
2. White Glue - I like Elmer's; easy to use, easy to find.
3. Windsor & Newton Matt Varnish - Get this at most Art/Craft supply stores (Michael's, Hobby Lobby, etc.) You'll use it a lot at the end of the tutorial, and if you have an airbrush, I recommend using it through your airbrush for your final sealing coat over a thicker aerosol application, such as Testor's Dullcote.
4. Toothpicks
5. A sculpting tool (optional)
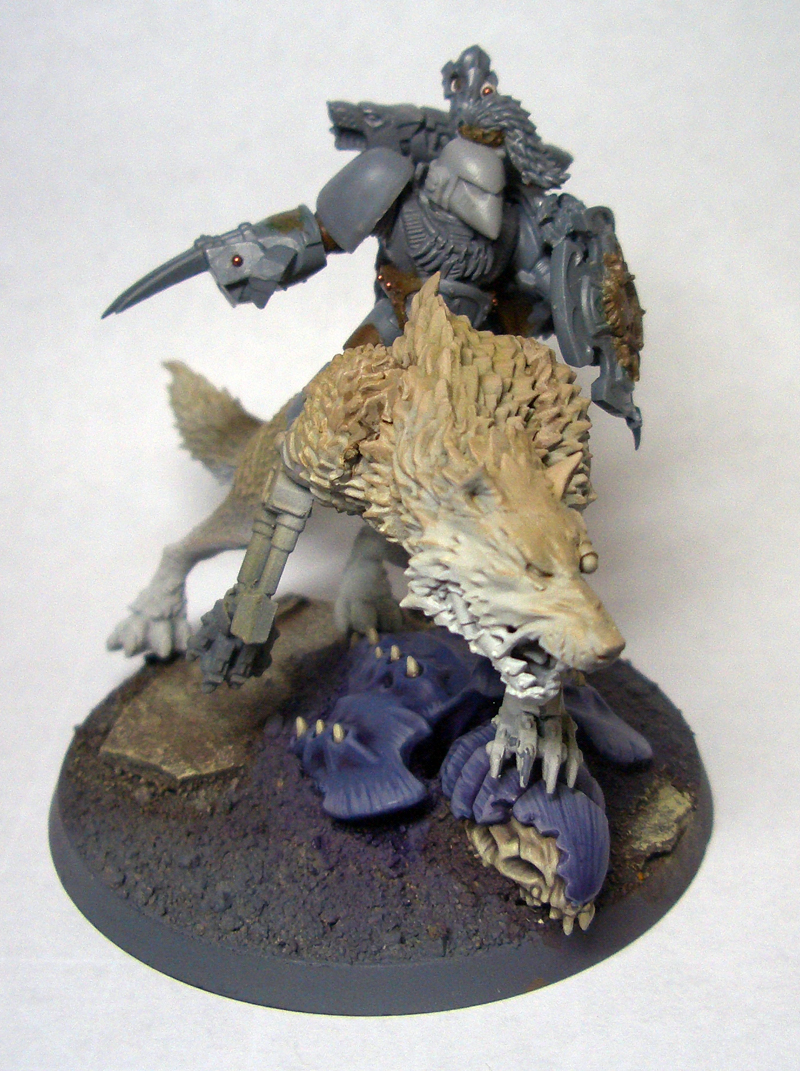
 And our test subject, a member of the vaunted Thunderwolf Cavalry. You'll want to complete painting the model before moving on to the snow basing. Notice I've used darker browns for the dirt and more muted tones for the rock, to suggest the the ground is soaked with moisture.
 Our first step is to mix a paste consisting of white glue and snow. Don't worry too much about ratios, just get it good and clumpy. You'll then use the toothpick or sculpting tool to place clumps on the base, and then mash the edges down to make it conform to the rest of the base. Pay attention to where snow might gather - around rocks, recessed areas, near a corpse. Give it a bit of time to dry, and you should have something like this:

Step two is to tie your clumps to the rest of the base, and creates a lighter concentration of snow. Start by pouring some white glue around your existing clumps, as well as anywhere you think might need a light coat of snow. Use a toothpick to smooth the droplets of glue out so that the layer is thinner, especially at the edges. Now take your snow, and tap the container liberally over the areas you placed glue. leave it to dry. Once dry, tap the model to get all the excess snow off, and you should have something like this:


Note that in some cases, you may need to do multiple passes of this step to get the coverage you want.
Now's where the Matt Varnish comes in. Take a paint brush, dip it in a 1:1 mixture of varnish and water, and the dip the brush in your snow. draw the brush over the model in places snow might land, such as parts of armor. Pay attention not to put snow in hot areas, such as exhaust vents or plasma coils, as well as focusing more snow in places where it's likely to cling better, such as animal fur or the cloth of a banner. When finished you'll have something like this:

Now it's just a matter of sealing your model, which is very important; without it, the snow you brushed onto your model will quickly rub off from use. As I said before, I recommend running your matt varnish through an airbrush if you have one. Otherwise, you can use dullcote or the like, but be very light with your passes - the snow has a tendency to absorb more than its share of the sealer, and will turn clear and lose the effect.
It may seem time consuming, but most of it is waiting for glue to dry, so it's something you can easily do in steps over the course of a day while you work on other things.
Try it out!
Let's jump into how I did it.

1. Woodland Scenics Snow - You can find this most places that sell supplies for HO scale trains.
2. White Glue - I like Elmer's; easy to use, easy to find.
3. Windsor & Newton Matt Varnish - Get this at most Art/Craft supply stores (Michael's, Hobby Lobby, etc.) You'll use it a lot at the end of the tutorial, and if you have an airbrush, I recommend using it through your airbrush for your final sealing coat over a thicker aerosol application, such as Testor's Dullcote.
4. Toothpicks
5. A sculpting tool (optional)


Step two is to tie your clumps to the rest of the base, and creates a lighter concentration of snow. Start by pouring some white glue around your existing clumps, as well as anywhere you think might need a light coat of snow. Use a toothpick to smooth the droplets of glue out so that the layer is thinner, especially at the edges. Now take your snow, and tap the container liberally over the areas you placed glue. leave it to dry. Once dry, tap the model to get all the excess snow off, and you should have something like this:


Note that in some cases, you may need to do multiple passes of this step to get the coverage you want.
Now's where the Matt Varnish comes in. Take a paint brush, dip it in a 1:1 mixture of varnish and water, and the dip the brush in your snow. draw the brush over the model in places snow might land, such as parts of armor. Pay attention not to put snow in hot areas, such as exhaust vents or plasma coils, as well as focusing more snow in places where it's likely to cling better, such as animal fur or the cloth of a banner. When finished you'll have something like this:

Now it's just a matter of sealing your model, which is very important; without it, the snow you brushed onto your model will quickly rub off from use. As I said before, I recommend running your matt varnish through an airbrush if you have one. Otherwise, you can use dullcote or the like, but be very light with your passes - the snow has a tendency to absorb more than its share of the sealer, and will turn clear and lose the effect.
It may seem time consuming, but most of it is waiting for glue to dry, so it's something you can easily do in steps over the course of a day while you work on other things.
Try it out!